By Justin Fort, automedia.com
Difficulty:
Moderate
Estimated time:
180 minutes
An engine misfires. It’s a sensation you instantly recognize but just as quickly block out. The engine stumbles for a moment and then regains its pace. Just as soon as the rpm settle down, though, the engine misfire reappears, and you’re stuck with the sinking feeling that accompanies all automotive problems beyond the shadow of your wisdom: “Something’s wrong.”
The sinking feeling is often followed by either, “This is going to be expensive,” or, “Why me/now/here?” All expected, but reasonable? What we recommend instead is, “How can I fix it?”
Engine misfires can be caused by a list of faults, but there are a few suspects that occur more than others. The primary villains are simple – spark or fuel – usually manifesting in spark plugs, plug wires, the coil(s) or the fuel-delivery system. There are other more dire causes: computer or wiring problems, breakage in the rotating mass (pistons, rods, crank bearings), valves and the heads can fail or distort, cooling difficulties might permit overheating and any number of gaskets could have pushed. Most are rare and, importantly, most of the scary stuff was probably caused by your failure to address simpler problems in the ignition or injection.
Engine misfires: Gather up the usual suspects
Consider the circumstances: 14-year old Toyota truck, 175,000 miles of 75 percent freeway use, plenty of time spent off road in the last 25,000. That means lots of mechanicals being used hard and showing their age. Yes, it’s our fault: Parts that were wearing out on schedule are more likely to do so sooner now, rather than the preferred later. It’s the anticipatable wave of maintenance that comes with new ownership of used vehicles. Don’t get lazy – just keep ahead of the curve.
While our miss was inconsistent, there were some notable details (always keep track of details for the sake of engine diagnostics). The miss came when the truck had been operated at a consistent speed (like freeway driving). It didn’t happen when the truck was cold but would show up when it had warmed up. This engine misfire didn’t arrive only under load: It could as well show up at idle as when accelerating. Of course, a misfire while accelerating meant the Toyota V6 got even slower.
The sensible method is to gather available knowledge about the engine misfire, focus on steps necessary to eliminate suspects and let the process guide you to its cause. Call it scientific method, with some sensible leaps. As for knowledge, if your car or truck is computer-controlled, the place to start is to plug in. A code reader, available from parts stores, will permit you to jack into the engine-control unit (ECU) and get a dialog of what’s up, what’s wrong and where it’s happening. The ECU can’t always tell you what specific part is broken, but in the case of our truck, it had stored data indicating there was an engine misfire in Cylinder #4. Okay, six cylinders of potential problems have just been narrowed to one.
Had we not been computer controlled, studying the spark plugs would have helped focus on possible sources of a misfire. It’s not hard to read the plugs: With a little attention and a good guide, such as those available in Chilton’s and Hayne’s manuals, plugs will indicate with clarity where problems are, if cylinders are out of tune and if they’re lean or fat.
Before you get started, however, be sure to follow all the car maintenance safety protocols with goggles, gloves and whatever else is needed.
Diagnose and investigate: Ignition
Choose your plan of attack – cheap to expensive, easy to difficult – and stick to it. It’s cheap and easy to start with ignition items, so we went to the spark plugs. Because the P0304 had repeated, the #4 plug came out first. It read lean (a gray-brown, not bad but trending hot and fuel-starved), predictive of a fuel problem rather than a spark problem.
The repair and replacement (R and R) of fuel injectors is a bigger project than the plugs, so we stuck to the plan and stored the knowledge in case ignition repairs failed to fix things. The other plugs had been replaced about 20,000 miles earlier and looked almost ideal. Every one was in good shape, short of the lean read on #4. We cleaned them up and swapped the plug on Hole #4 with #2. If the problem were the spark plug, the misfire would move to #2. It didn’t. P0304 came back.

Plug read: ash-brown with a hint of green – good mixture on late-model engine. Touch of gray from hot, hard run up and down Black Mountain. White flecks, bad gas?
Plugs good, plug wires not? The born-on dating for plug wires is easy to find on Toyota products – it’s stamped on the wire. Those on this truck were as old as the truck itself and probably original, so even though they ohmed out fine and looked good – if dusty – at 175,000 miles, it was not hard to justify a new set. With a new set of wires in place, the P0304 came right back, so it wasn’t a wire problem. On the flipside, now we’ve got what looks to be a good backup set, and a new set on the motor that’s got to be worth at least 100,000 (it’s a Toyota, so we’ll let you know).
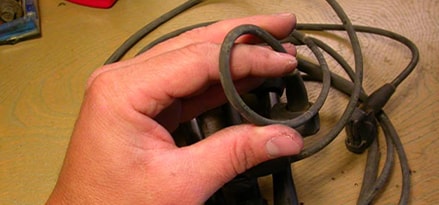
There are a few easy ways to test plug wires. Examine them in the dark, engine running, and watch for sparks jumping. Next, mist the wires with water and see if this causes any sparks (in the same dark environs). You can remove a wire and gently bend it to see if the rubber sheathing cracks. All of these indicate failing wires (and don’t worry, you’re looking for small sparks).

The bend test: Even with 175,000 miles on them, the OEM plug wires take a curve without cracking. Quality OEM product right there.
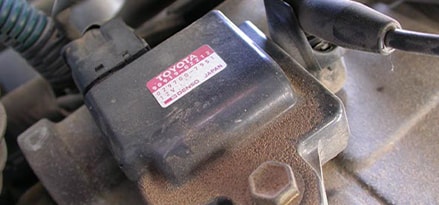
With the spark throwers and spark carriers cleared of responsibility for code P0304, we moved along to the spark makers. On this Toyota, three coil packs live on the #1, #3 and #5 cylinders, and each power a plug there and on the opposite side of the engine, at #2, #4 and #6. The system is called waste-spark: The coil shoots two sparks at once, and the plug fires twice in the combustion cycle –once to fire the cylinder and once more to clean up the leftovers in the exhaust stroke. Other vehicles can use a single coil firing through a distributor or a single coil on each cylinder, but your job’s the same. Find the problem, and solve it.
We’d tested plug and wire, so it’s on to the coil. Using a multimeter, you can test the ohm ratings of both primary and secondary outlets on the waste-spark coil, and all of those on this truck tested well (between 0.67 and 1.05 ohms at the primary, 9,300 to 16,000 ohms for the secondary). Consult your repair manual or factory service manual (FSM) for all the test ratings. With no indication of a bad coil, a return to the swap methodology (sensible method) had us switch the #1 and #3 coils, but the miss at #4 remained.

One of three waste-spark coils on the Toyota V6. They don’t usually fail until 200,000 plus miles, so expect to find them dirty and untouched.

If you don’t own one, experience for yourself why the multimeter gets called the “Ten Buck-O-Meter.”
With P0304 continuing despite plug, wire and coil checks, we were done with easy fixes. On to the next suspect, indicated by the plugs (lean read on #4), misfire behaviors (intermittent, heat-related and occurring at consistent rpm) and the elimination of other suspects: fuel. Though an injector problem had been suggested earlier, it was best to rule out the ignition parts before moving on to a set of injectors that required some real wrenching to access.
Fuel injectors
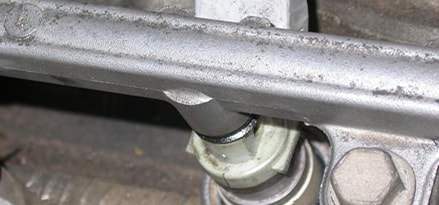
No matter how you’re powered, pulling fuel injectors is a bit of work. Short of a straight-four or six with fuel injectors hanging off the side of the head (and even then, probably smothered with wires, cladding and bracketry), pulling fuel injectors isn’t quick work. Lots of noncorrosive penetrant will help release hoses and gaskets, especially notoriously tricky injector O-rings (try Liquid Wrench®). Have a few spare O-rings around. The fuel rails usually hold the injector in place, so be gentle when it’s time to pull the rail off so as not to damage the injectors or the O-rings. Some manifold gaskets are metal, as with this Toyota V6, and can be reused if you’re gentle (and they haven’t been cooked). Expect to replace gaskets most of the time.

The fuel injector is nestled beneath the rail in this shot, with the rail holding it gently in the injector port. You must be equally as gentle.
A fuel injector’s resistance can be tested with a multimeter too. On this Toyota engine, the gray-top injectors (often identified by color) should test between 12 and 16 ohms. The Hole 4 shooter read 0.018 ohms: That’s a clear indication that there was a fox in this henhouse. The bad fuel injector was just as dirty and slimy as the other injectors, so the multimeter was necessary to see it for what it was. Speaking of dirty, a bottle of fuel injector cleaner could save you this job, should the injectors just be clogged and not mechanically toast.
We decided to embrace the “sensible” part of this project and skip swapping two injectors to test whether #4 was bad. Considering all the fingers pointing at the fourth fuel injector, the time involved in the R and R of injectors was too much. Swapping two injectors, then reassembling and replacing the manifold, hoses, brackets and bolts only to see what was very likely the bad #4 injector shift the misfire to #2 was a big waste of time. The price for the failed gamble of just replacing #4 would only be doing the R and R anyway, so it seemed a risk worth taking.
We R and R’d the lean-firing, bad-ohming, P0304-earning #4 injector with a used injector sourced from a local Toyota salvage yard (which had tested at 14 ohms – bring your test gear to the junkyard). Should this gamble pay off, it would put us in good shape much sooner than doing everything twice. The manifold on this Toyota – a two-piece clamshell type of unit – came off with the usual Toyota ease, and we had it back together in under two hours, torqued to go. In standard no-drama Toyota style, it fired right up, the misfire gone. Now you do it.
